Sunday, March 19, 2017

Must Make Now!

You know how sometimes you see a project or pattern that you just have to make RIGHT NOW? This one was one of those for me. I saw Johanna's Lost in Time on Ravelry, and immediately started planning a trip to the yarn store to get the yarns for it. Like, leaving work early and getting to a yarn store a.s.a.p. Well, somewhat fortunately, I was too busy at work and wasn't able to do that, forcing me to think about it for at least a few hours before I rushed to buy more yarn.

I have a sizable stash. Like, there is yarn in every room of the house. Well maybe not the boys' rooms or the bathrooms. But every other room, for sure. A friend once commented that my house is so cozy because there is yarn everywhere. :) (Thank you Ruth! I agree! ) Anyway, I did not need to go and buy yarn for this! After all, it is the perfect left-over yarn project, with almost every row being made in a different color. So I searched high and low in the house for all the yarns that might work for this and piled them on a table, and started playing with color combinations. Like Johanna, I too wanted a vintage feel to the color scheme. These soft creams, browns, greens, and yellows to me achieved that:


I don't care for knitting with cotton much, so I didn't have hardly any cotton in my stash. Instead, these are various fingering weight wools and alpacas. Because my yarn is much thinner than the pattern, I'm using a 3.5 mm hook instead of the recommended 4 mm. But this being a triangular top-to-bottom shawl with a 14-row repeat that you can keep repeating as long as you have the size you want, gauge really doesn't matter much.


After each repeat I'm pausing to think through the color combo for the next repeat. So much fun!! I think I may need to make more than one of these...


Pattern: Lost in Time
Yarn: various fingering weight yarns, including Isager Hojlandsgarn, Elann Pure Fine Alpaca, Kauni, Tukuwool, and others.
Hook: 3.5 mm

A word of caution about the pattern: this is not a beginner project by any means. In addition to the pattern including some advanced stitch patterns, it is also a little challenging to follow, particularly with the color selections being on a separate web page, given in "code." But fear not--if you are patient and plan your colors in advance, you shall emerge victorious! :) Also, it is a free pattern, so I will take what is given. Had I paid money for it, my expectations would be that much higher.

Sunday, March 05, 2017

Edgings

Last night I finally got to finishing my latest scarf (shawl? where's the line between a scarf and a shawl?) in the works.


The yarn is Caterpillargreen Yarns Merino twist fingering in color Weekend, classic striping. (Love it!!!) It looks like the company just changed their name from Caterpillargreen to Gauge Dye Works. They make their yarns in three different striping patterns: classic strips, accent skeins, and shawl stripes. The shawl stripes skeins are specifically dyed for triangular shawls so that the sizes of the stripes remain the same even though the rows get longer. Ingenious! However, for my plan the classic stripes worked better since I wasn't going to make a triangular shawl. (You should check out their website. It looks like the colors are smaller batches, so they tend to run out, but they also have gorgeous shawl kits that you can pre-order to make sure you get the colorway you want.)

I'm not using a pattern, I just made up the short-row sections as I went along with a mental image of what I wanted the shawl to look like. I wanted a sea of undulating colors that grows sort of organically without too much symmetry. I was quite pleased when it worked out without too much ripping back.

I knew I wanted an edging with more of the YO-k2tog holes that I had used throughout the shawl to accentuate the sections. I had used this edge from Aestlight in two shawls already:


It's one of my favorite edgings, relatively simple and fast and works particularly well for shawls that utilize garter stitch. And it makes for a pretty, wavy edge. This time I wanted a few more holes, though.

I experimented with a couple of different size triangles for the edge, and also tried making the triangle in the reverse direction. The triangles can either be made by increasing one stitch on every other row and then casting off on the last row of the triangle, or by casting on at first, and then binding off one stitch at a time. It turns out the latter is slower, the cast on edge is sloppy, and the bind off edge is bumpy. So no good. The first option is faster to make and looks neater.

The idea is to increase one stitch on every other row to shape the triangle. If I wanted more holes, I needed to pair up each YO with a k2tog, except for one that would be the increasing YO. Depending on how you want it to look, you could place the extra YO (the increasing YO) at the beginning of the row or at the end. I decided to place it at the end, and then leave a two-stitch garter edge. Here's what my little triangles look like:


(Turns out that when you have a table made out of reclaimed barn wood, you can pin your knitting directly to the table. Handy!)

Lacy Triangle Edge pattern:

Set-up row A: With shawl stitches on the needle, cast on 3 stitches by backwards loop CO. Turn.
Set-up row B: k2, k2tog.

Row 1: s1wyib (slip 1 with yarn in back), YO, k2.
Row 2: k3, k2tog.
Row 3: s1wyib, k1, YO, k2.
Row 4: k4, k2tog.
Row 5: s1wyib, YO, k2tog, YO, k2.
Row 6: k5, k2tog.
Row 7: s1wyib, k1, YO, k2tog, YO, k2.
Row 8: k6, k2tog.
Row 9: s1wyib, (YO, k2tog) twice, YO, k2.
Row 10: k7, k2tog.
Row 11: s1wyib, k1, (YO, k2tog) twice, YO, k2.
Row 12: k8, k2tog.
Row 13: s1wyib, k to end.
Row 14: bind off 6, k1, k2tog. (To get a pointier tip, I knit the first bind-off stitch rather than slipping it)

Each triangle casts off 7 stitches of the shawl edge. You can easily make the triangle bigger or smaller by adding rows. Note that I had a row of YO-k2tog holes at the edge of the shawl before I added the triangle edging, so those holes are not part of the edge pattern.


What is your favorite shawl edge pattern?

Friday, February 24, 2017

Hello!

Yes, I'm back once again! If you've been coming here for a while, you know that I’ve had many starts and stops in blogging, with long breaks in between. But no worries, I always come back! :) I've given it some thought, and decided I want to keep the blog alive for various reasons. 

First, and in general, I would like to see more craft blogs stay alive. As I've said before, I love Ravelry--it's the best place for quick updates, for storing and finding information, and for finding other knitters and fiber enthusiasts. But on Ravelry, I find myself feeling like I’m alone in a big crowd. I do belong to a number of groups, but even the groups are so big that unless you know someone, you are practically anonymous behind your username, and developing knitterly relationships seems difficult. I also love reading other people’s blogs—they are usually more personal than a project post on Ravelry, and they include more detailed thoughts on the projects. 

Second, I miss the conversation. A conversation about knitting, and sometimes crochet, or some other crafty pursuit. I occasionally post a comment on a blog I follow, but it feels a bit like a one-sided friendship. Kind of like sending fan mail to a rock star. :) Here, I hope to develop more of a knitting-group kind of conversation. My goal is to try and write posts that facilitate conversation, and to respond to comments in a timely manner. So please do comment, if nothing else, just to say hi! And if you're not comfortable commenting in English, feel free to challenge me in your own language. I do ok in Finnish, Swedish, German, and can say hello in Norwegian, Danish, Russian, and Bulgarian. Maybe even French, Spanish and Italian. I'm a little weaker on the African and Asian languages, though... Anyway, my point is, I'd love to hear from you and connect with you through the comments.

Allright, enough blogging philosophy, now to some knitting.

Earlier this year I caught a leftover-stash-busting bug. In fact, it started already before Christmas, and I made a few Christmas ornaments, but those didn't take up enough yarn. So I thought I'd try one a slipper pattern from my Ravelry queue. (My Ravelry queue is out of control... can anybody relate? I through stuff in there much faster than I can knit. Every now and then I clean some things out of there that I know I'll never make. But right now it's 402 patterns long!)

I started the first slippers with two fingering weight sock yarns (Trekking XXL and Malabrigo sock, I think) held together, as suggested. But the slippers were turning out much too narrow. So I started over with a few more stitches, and to accommodate my wide feet, added a couple more before the toe (the part where the sides join together). I crocheted the seam with a contrasting color and just loved the result! Plus I could make one slipper in one evening, so this was a super fast project to boot.


This is the inside of the toe. I like how neat the crocheted seam looks like from this side, too. I might use that in one pair..


On Ravelry: Garter Stitch Slippers
Pattern: Simple Garter Stitch Slippers by Hanna Leväniemi

They are comfy, warm, cute, fast to make, and use up leftover yarns. What's not to love?!? So I made more. Three more pairs, in fact. I don't have pictures of one of the pairs, but it's the same green combo as the green slippers, in a grown-up size.


On Ravelry: Garter Stitch Slippers 2
Pattern: Same as above; three yarns held together, fewer stitches, but still increased for the toe.


showing off our paws


On Ravelry: Garter Stitch Slippers 4
Pattern: Same as above, made in a kid size (cast on 25 stitches). Three yarns held together. The true color was hard to capture; it was something between the warm green in the yarn-ball picture and the cooler green in the middle. 

After four pairs, I ran out of steam. But I ended up using at least 2/3 of my sock yarn left-overs! Win!
What is your favorite leftover stash buster pattern?

Saturday, April 09, 2016

In the Basket

Husband: What are you making now?
Me: A sweater.
Husband: But didn't you just finish a sweater?
Me: ???


What: Flaum sweater by Justyna Lorkowska
Yarn: Quince & Co. Owl, color Lagoon
Needles: 4.5 mm circular
Feeling: so cushy... love it!


I went with the pattern yarn to make sure I get the right drape. I don't think this sweater would work out great from a yarn that's very drapey. Owl has lots of loft and structure and holds its shape well.


I bought this cute little project bag from Ravelry. They were sold at a discount because the text has a typo. Go ahead, try and find it!

Friday, April 01, 2016

Candidate for new favorite sweater yarn?

I'm always on the lookout for a good sweater yarn. Something that is the right weight (about fingering to sport) looks good, feels good, behaves well (doesn't stretch or shrink or do other weird things), and most of all, doesn't pill.

I can't tell you how many sweaters I've made that look like they've been worn for years after just a couple of days of wear, or sometimes even before the damn thing is finished. I have finally learned my lesson that non-pilling is the most important quality in a sweater yarn, and it's worth paying a little extra money for. Even if I could knit two sweater out of cheap yarn for the price of one made out of good yarn, I've got far more use for one good sweater than two that look terrible.
Enter Mohawk Wool (the gray yarn here):


It's the right weight. It looks good and feels good. It behaves well.* And most of all, so far no evidence of pilling!

To be perfect, the yarn would be 100 % natural fibers. Mohawk feels quite woolly, but it actually has 10 % nylon. Oh, well. I guess you just can't have it all. The rest of the yarn is 60% Merino and 30% Romney Wool. One drawback is that Mohawk only comes in natural colors, ranging from off-white to dark gray and brown. Those are great colors for sweaters, but I do hope they expand their color selection at some point.

I used Mohawk to make Paulie, as seen here. 

Pattern: Paulie by Isabell Kraemer
Yarn: 350 g or 3.5 skeins Mohawk (about 1290 yards) and 85 g of Mad Hatter gradient mini skeins (about 200 yards)
Needles: 3.5 mm circular
Size: L
Thoughts: Thumbs up! It's comfy and fits well, and I love the yarns (both of them) and the colors.


I was also happy to find buttons to match from my LYS, Lakeside Yarn


*I initially had some concerns about biasing. I use a center-pull ball and usually have no problems with the little bit of twist it adds/removes. This time there was a noticeable amount of biasing in the bottom and center section of the body, which I suspect was caused by not enough twist. However, after wet blocking and when I'm wearing the sweater, I don't notice it.

Wednesday, March 23, 2016

The most softestest awesomest yarn...

(Yes, softestest is a thing. Not a typo.)

Yesterday I drove over to my favorite yarn shop (The Yarnery in St Paul, MN) over lunch to find some yarn for a shawl project. I usually browse through the different sections of the store even if I have a particular yarn and project in mind, just to see what's new. And to touch yarn, because, as you know, touching yarn just makes you feel better. And who doesn't need to feel better on a Monday?

Anyhow, I came across a little sample knitted out of Shibui Knits Pebble. O.M.G. This yarn... it was the softest, the most beautiful tactile experience, while looking like Real Wool. (You know, a little rough, not too smooth or shiny.) It's made out of recycled silk, merino, and cashmere. And while those are all wonderful fibers, I rarely go for something with silk or cashmere, and I've started to move away from merino toward more Real Wool containing yarns. But this stuff... I wanted to wrap myself in it, rub it on my face, and not let go.

Pebble on the left with a ball of Zauberball Original
But this awesome buttery stuff was not cheap. Over $18 for 25 g. So I settled for one skein, which I will use as a contrast color in my shawl, just to remind myself of the awesomeness that exists.

When the world seems to be going crazy, it's good to have something to remind you of wonderful and beautiful things out there.


Peace!
Lotta

Monday, August 03, 2015

Socks, socks, and more socks...

I think something must have snapped earlier this spring... Somehow I managed to convince myself that it would be a good idea to sign up for Tour de Sock. You know, the sock knitting competition where you crank out six pairs of socks, one pair about every ten days. Except since it's a competition, you try to knit a pair in about a day or two. If you want to score any points, that is. (And I do, of course.)

Before the start of the tour, I thought I should knit a warm-up pair because it had been a while since I'd knitted socks in a lace pattern. I also wanted to try adding beads because the odds were there was going to be at least one pair on the tour with beads. I chose Stardust by Adrienne Fong:

On Ravelry
Yarn: Brown Sheep Wildfoote Luxury Sock Yarn
Beads: size 6/0
Needle: 2.5 mm
Hook: 1 mm
Construction: traditional top down, small cables continue at the side of the heel; beads throughout the lace pattern
Thoughts: ok pattern, but I rather enjoyed using beads!

Then I thought I should also try a sock with an unconventional construction, such as a different way of making gusset increases and a heel. Enter Love and Liquor by General Hogbuffer:


On Ravelry
Yarn: Regia Angora Merino, two balls
Needle: 2.5 mm
Construction: toe up, gusset increases at the top, cables wrap around the back to make up the heel
Thoughts: fun pattern to knit, but the fit is not good for my wider than wide feet.

By then I felt like I was properly warmed up and could start the first stage of TdS. The race started with a beautiful twisted cable sock Virrat by TiiQ.


On Ravelry
Yarn: Cascade Yarns Heritage 150
Needle: 2.75 mm
Construction: toe up; gusset increases in the bottom; interesting heel
Thoughts: beautiful sock with an interesting, well thought-out yet no-fuss pattern. Love it!

At this point of the race I was very excited, although a little disappointed that the start times did not coincide with when it would be convenient for me to knit for 12 hours straight. Oh well, there would be stages that start on a weekend morning, right? The next stage got me even more excited with a pattern called 
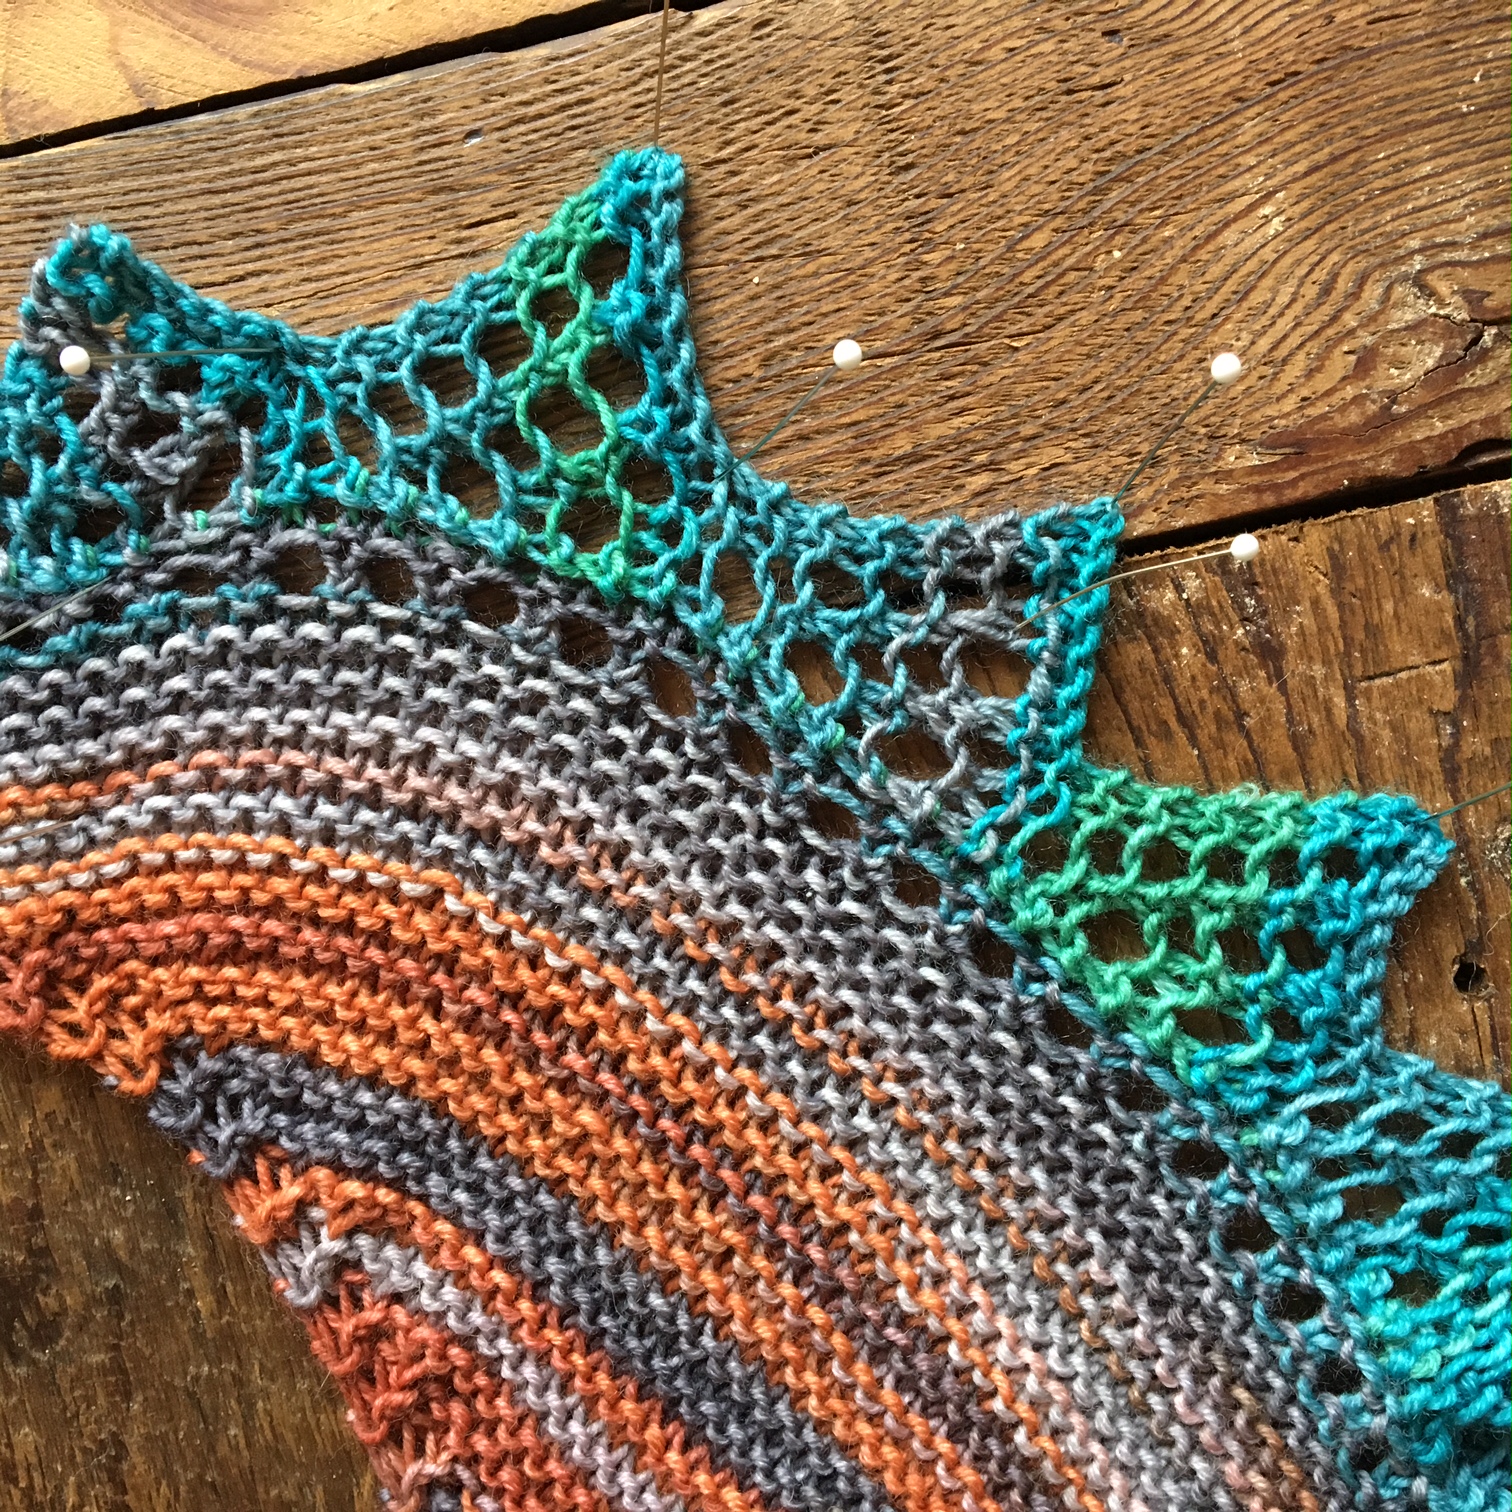
Far into the Forest by Kirsten Hall. This was exactly the kind of thing I signed up for!


On Ravelry
Yarn: Cascade Yarns Heritage 150
Needle: 2.5 mm
Construction: toe up; gusset increases on the sides; all kinds of interesting things going on all the time!
Thoughts: Love the socks! This pattern was highly detailed and required a lot of attention to detail the whole time.

At this point I was a little bothered by the fact that the minimum size was quite small, but to place well on the race I would have to knit the minimum. They are quite tight on my feet. Hmph.

Next pattern was called Touring Bubbles. Neither the stitch pattern nor the look of the sock got me excited. But that's ok, I didn't expect every pattern to be perfectly to my liking!


On Ravelry
Yarn: SweetGeorgia Yarns Tough Love (a sponsor yarn that gave me an extra point)
Needle: 2.5 mm
Construction: Top down, nothing exciting.
Thoughts: meh... but the yarn was nice!

Then I started to run into even more timing issues. During the next two stages I traveled back home and although I had lots of time at airports, the leisurely weekend knitting I'd been looking forward to was gone. The next pattern, called From a Distance was knitted mostly at airports and on airplanes. I guess that's somehow fitting...


On Ravelry
Yarn: Malabrigo sock
Needle: 2.5 mm
Construction: Top down with beads, provisional cast-on
Thoughts: Love the socks! however, pattern left something to be desired...

I enjoyed making these and I think they look very nice. On one airplane, as we were deboarding, a British gentleman who had sat next to me commented that he and his wife were "quite impressed" with my knitting skills and that they had never seen anything quite like it! :) However, as the grumblings in the Ravelry group discussions reflected, it appeared that the pattern was not very carefully put together and could have been improved with a bit more attention to detail. But I liked the end result regardless. So thumbs up for stage four!

The next stage left me disappointed. I saw the pattern (Ophidia) and thought "do I really have to knit these?" I did not care for how the sock looked at all. Oh, well, I would knit them and next round would be something more exciting, for sure.


On Ravelry
Yarn: Novita Pikkusisko
Needle: 2.5 mm
Construction: Top down, intarsia contrast stitch, gusset at the back of the leg
Thoughts: ugh...

Right off the bat I ran into issues with yarn. I was traveling, so I had to rely on whatever I had with me. I started the first sock with Malabrigo sock and size M, but it was turning out so small I would never be able to get the sock on my foot. And it was Sunday, and no yarn shops were open. Boo! At the local supermarket I was able to find one yarn that was a suitable weight (a little heavier than Malabrigo). However, it was nasty to knit with, rough and splitty. Also, to get socks that would fit me, I'd have to knit size L, which would preclude me from placing in the stage. I felt defeated, and instead decided to knit  the minimum size, S. The end result was so small that my 11-year-old could hardly get the socks on his feet (which are not big by any means). Some racers were able to get grown-up sized socks out of the smallest size, but I think their gauge must have been quite a bit looser than mine, which was the same as the specs in the pattern. However, it wasn't all negative--two positive things about this pattern were the interesting gusset at the back of the leg, which did cause a very tight fit around the heel, and the contrast stitch, which I'm sure I will use again in something else.

As it turned out, this ended up being my final round of the race. The last stage included a pattern that had a "seam" at the back that to me looked like a mistake or the result of bad planning. I would have liked to fix it by modifying the design a little, but such modifications were not allowed in the race. I decided that five pairs of socks were enough for me this time.

Sunday, May 31, 2015

Thalia

The second shawl/scarf for a wonderful teacher is based on Kirsten Kapur's Thalia.


 I very much enjoy Kirsten's patterns and this one was no exception. The shawl begins from the top center with a double-yarn-over center section. I don't like to keep referring to the pattern the whole time, so I used stitch markers to mark the increase points (there are three plus the edges).


I held the yarn double, but even so the shawl turned out rather small. That's ok though, it'll work well as something to drape on the shoulders or wrap around the neck once.


Pattern: Thalia
Yarn: Isager Strik Alpaca 1, held double
Needle: 4 mm


Thursday, May 28, 2015

Nuku Nuku Nurmilintu

The end of the school year is fast approaching and I needed a couple of gifts for teachers. Conveniently, we were going to take a long road trip over Memorial Day weekend, meaning lots of hours sitting in the car, and a great opportunity to crank out a couple of scarves.


Nurmilintu was actually the second one in the order of knitting, but happened to be the first one I got around to photographing. It was a nice, quick knit--started on Sunday and finished on Wednesday.


 I spiced it up a bit by using two colors. I made the last garter stitch section a little longer, and doubled the length of the final lace section both because I just liked how it looked, but also because I wanted the size just a bit bigger than what it would have been according to the pattern.


Pattern: Nurmilintu ("nurmilintu" is a bird in a Finnish nursery rhyme)
Yarn: Berroco Alpaca Fine, less than one skein of each color
Needles: 4 mm


This package is going to the orchestra teacher as a thank you for making my kid want to be an orchie again! Couldn't thank her enough! (Turns out kids want to be in orchestra when practice is fun, not when they get yelled at. Go figure...)

Sunday, April 05, 2015

Royal

A little girl I know is in need of a princess crown. As are almost all little girls, I believe. Enter Auntie Lotta's royal crown shop:


I browsed crown patterns on Ravelry (there are surprisingly many) but didn't find anything that would fit the bill exactly, so I set out to device my own. I needed it to look enough like a real crown to fit a real princess, but yet be sturdy enough to withstand play and wear. Also, I needed it to fit a 2-year old's head.

I started with a cotton blend yarn, about light sport weight, and added sparkle with a metallic crochet thread. I also wanted to add some bling bling, and decided that the safest way (to avoid a choking hazard) was to crochet in some small beads. If this was for an older kid, I would have added more bling.


Pattern: my own (see below)
Yarn: Premier Yarns Cotton Fair (52 % cotton, 48 % acrylic) and DMC metallic embroidery thread, color light silver. I didn't use the metallic on the first three rounds because I was afraid I would run out--the spool only had 40 yards.
Hook: 3.5 mm
Other: Mod Podge Stiffy; glass or plastic beads size 10 or larger (I used 16 clear and 8 turquoise beads)
On Ravelry: project and pattern


In case you want to make your own royal crown (and who wouldn't??), here is my pattern. As written, this makes a crown with a 46 cm or 18 inch circumference. To adjust the size by just a little, the easiest this would be to adjust yarn and hook size. Otherwise, you can add or reduce pattern repeats. The pattern repeat is 12 s, and the pattern as written has 8 repeats.

Abbreviations: CH chain stitch; SL slip stitch; SC single crochet; DC double crochet; TC treble crochet.
Royal
  1. CH 96s, join in the round with SL.
  2. CH 3s, DC 1 in each of the stitches of the previous round. Join with SL.
  3. Repeat round 2.
  4. CH 5s, *DC 1 in the third stitch of the previous round, CH 2s*, repeat *-* all the way around. Join with SL to the 3rd stitch of the initial CH 5s.
  5. CH 1s, * DC 5 into the next DC of the previous round, SC into the second DC of the previous round*, repeat *-* all the way around. Join with SL.
  6. SL3 (end up at the center top of the first cluster), *CH 7s, SC to the center of the next cluster of the previous round*, repeat *-* all the way around. IF USING BEADS: thread a bead over the metallic thread loop after you pull the SC loop through the center stitch of the cluster. Continue to crochet as usual. I used 16 clear beads on this round.
  7. **EDIT 2/1/2017 (this change was noted in the Errata on the Ravelry pattern page)** SC 7s in the next space. Repeat all the way around. Join with SL to the first SC.
  8. SL3 (end up at the center top of the first arch), *CH 4s, TC into the center of the next arch, CH 7s,  TC into the same center stitch, CH 4s, SC to the center of the next arch**, repeat *-* all the way around. IF USING BEADS: thread a bead over the metallic thread loop after you pull the SC loop through the center stitch of the arch. Continue to crochet as usual.
  9. *SC 4s, SL1 at the top of the TC of the previous round, SC 4s, into the leg of the last SC stitch: **CH 3s, SL1, CH 5s, SL1, CH 3s, SL1**, SC 3s, SL1 at the top of the TC of the previous round, SC 4s*, repeat *-* all the way round.
  10. Weave in ends. Place the crown over a suitable size cylinder or cone (I used a large roll of paper towel covered with a plastic bag). Stiffen with a suitable media, such as Mod Podge Stiffy, starch, or sugar solution. Allow to dry in place. Mod Podge required two applications. If you're not concerned about a choking hazard (children under 3 yrs), you can add more beads or jewels at this point by sewing or gluing.
© 2015 Lotta Kiuru-Ribar;  All Rights Reserved